前言
接触大数据以来,主要写 Spark SQL 和 HQL 来处理数据。关于 MR,除了公司有些数据导入工具是采用 MR 来写的,顺便了解了下,其他时候都没怎么用过。现在想想,未免有些跳的太快了,Spark ,Hive 中的思想有很多也是借鉴 MR 的。甚至最初始的 Hive 就是 SQL 版的 MR。
本篇主要用来介绍一些 MR 的自定义特性以及如何编写 MR 程序。我们只需要告诉框架做什么,而不用关心框架怎么做。
MR 中的 shuffle
shuffle 机制几乎贯穿在所有大数据处理框架中。MR 中的 shuffle 是什么样子的呢?
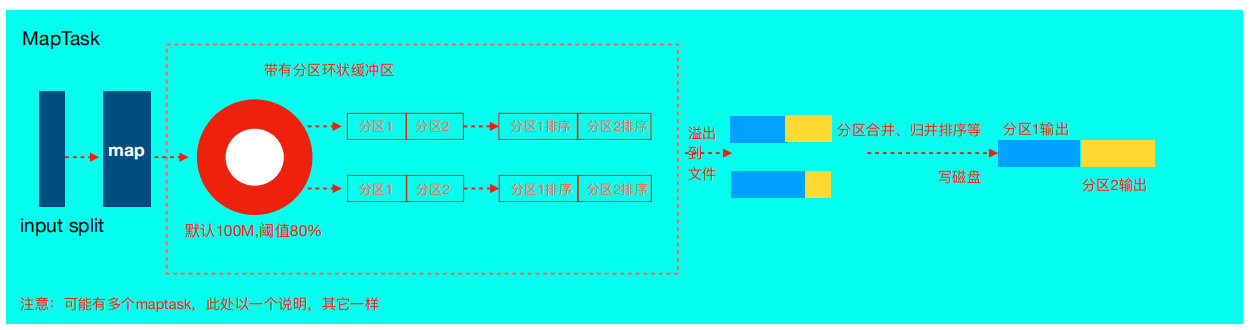
- InputFormat 组件读取数据,split 逻辑切片(和 block 大小有关),划分出各个 MapTask 处理数据。
- 经过自定义的 map 逻辑处理完之后,context.write 进行数据收集,并进行分区。
- 数据开始经过环形缓冲区,缓冲区大小默认 100m,达到默认溢写比例 0.8 后,数据便会溢写到磁盘上,溢写过程中一定会做排序,多次溢写会产生多个文件。
- 合并溢写文件到一个磁盘文件,内部记录索引信息表明下游每个 reduce 对应数据的偏移量。
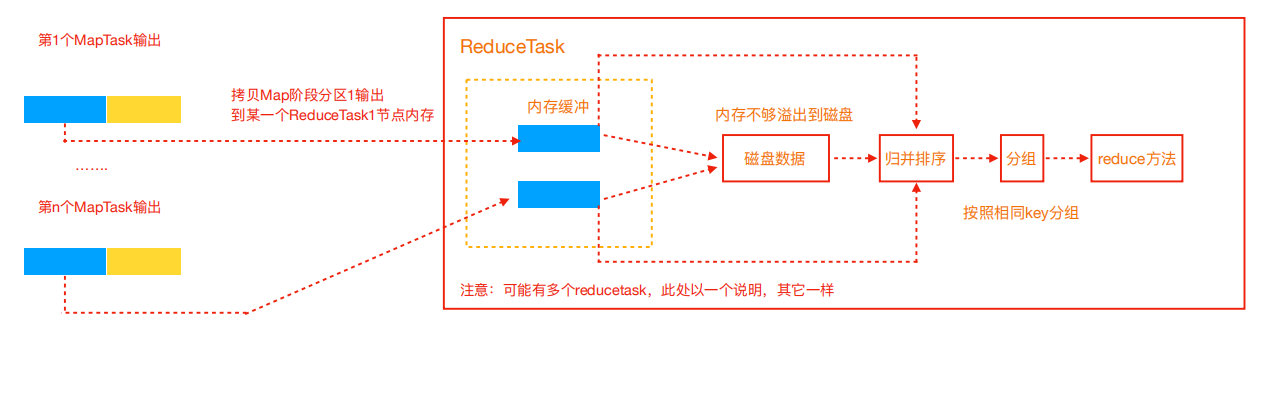
- 下游 reduceTask 拉取 Map 端处理后的数据,
- 拉取的数据同样会先放入内存缓冲区中,达到阈值后便会溢写到磁盘,最终会合并成一个文件并排序(归并排序)。
- 经过自定义的 reduce 逻辑处理后,交由 OutputFormat 组件输出最终结果文件。
MR 程序的编写
MR 的抽象已经很好了,一般只需要编写 Mapper,Reducer,Driver 三个类,我们只需要确定每个阶段的输入输出类型即可。如果需要编写复杂的 pipeline,则需要编写多个 MR 程序串联,这也是 MR 相比后起的 Spark 等大数据框架处理慢的原因(MR 计算的中间结果都要落盘才能被下一个 MR 读取)。使用 Java 编写 MR 程序,都要引入以下依赖,这里使用的 Hadoop 版本是 2.9.2。
1
2
3
4
5
6
7
8
9
10
11
12
13
14
| <dependency>
<groupId>org.apache.hadoop</groupId>
<artifactId>hadoop-common</artifactId>
<version>2.9.2</version>
<dependency>
<groupId>org.apache.hadoop</groupId>
<artifactId>hadoop-client</artifactId>
<version>2.9.2</version>
</dependency>
<dependency>
<groupId>org.apache.hadoop</groupId>
<artifactId>hadoop-hdfs</artifactId>
<version>2.9.2</version>
</dependency>
|
lombok 可选,主要是有些很方便的注解
1
2
3
4
5
6
| <dependency>
<groupId>org.projectlombok</groupId>
<artifactId>lombok</artifactId>
<version>1.16.18</version>
<scope>provided</scope>
</dependency>
|
简单的WordCount
Mapper
Mapper<> 中的4个字段分别代表 Map 阶段的输入输出的 key,value 类型。Hadoop 本身已经封装了常见的序列化类型,比如 long->LongWritable,string->Text。
1
2
3
4
5
6
7
8
9
10
11
| public class WcMapper extends Mapper<LongWritable, Text, Text, IntWritable> {
Text k = new Text();
IntWritable v = new IntWritable();
@Override
protected void map(LongWritable key, Text value, Context context) throws IOException, InterruptedException {
String line = value.toString();
k.set(line);
context.write(k, v);
}
|
Reducer
Reducer 接收 Map 阶段的输出,并对同一个 key 进行汇总统计。
1
2
3
4
5
6
7
8
9
10
11
12
13
14
15
| public class WcReducer extends Reducer<Text, IntWritable, Text, IntWritable> {
IntWritable v = new IntWritable();
@Override
protected void reduce(Text key, Iterable<IntWritable> values, Context context) throws IOException, InterruptedException {
int sum = 0;
for (IntWritable value: values) {
sum += value.get();
}
v.set(sum);
context.write(key, v);
}
}
|
Driver
MR 程序的启动类,
1
2
3
4
5
6
7
8
9
10
11
12
13
14
15
16
17
18
19
20
21
22
23
24
25
26
| public class WcDriver {
public static void main(String args[]) throws IOException, ClassNotFoundException, InterruptedException {
Configuration conf = new Configuration();
Job job = Job.getInstance(conf);
job.setJarByClass(WcDriver.class); /* 设置启动类的位置* /
job.setMapperClass(WcMapper.class); /* 设置 Mapper 类 */
job.setReducerClass(WcReducer.class); /*设置 Reducer 类*/
job.setMapOutputKeyClass(Text.class); /* Mapper 的输出 key 类型*/
job.setMapOutputValueClass(IntWritable.class); /*Mapper 的输出 value 类型*/
job.setOutputKeyClass(Text.class); /*Reducer 的输出 key 类型*/
job.setOutputValueClass(IntWritable.class); /*Reducer 的输出 value 类型*/
FileInputFormat.addInputPath(job, new Path(args[0]));
FileOutputFormat.setOutputPath(job, new Path(args[1]));
boolean result = job.waitForCompletion(true);
System.exit(result ? 0 : 1);
}
}
|
自定义序列化类型
自带的类型往往不满足需求,比如需要统计本校毕业生 2018~2020 的平均薪资,此时 Map 的 value 不在是一个字段,是三年薪资的加和在平均。自定义序列化类型只需要实现 Writable 接口。这里引入了下 lombok 的 @Data 注解来自动生成 set,get 方法
1
2
3
4
5
6
7
8
9
10
11
12
13
14
15
16
17
18
19
20
21
22
23
24
25
26
27
28
29
30
31
| @Data
public class StuSalary implements Writable{
private long firstYearSalary;
private long secondYearSalary;
private long thirdYearSalary;
public StuSalary() {
}
public StuSalary(long firstYearSalary, long secondYearSalary, thirdYearSalary) {
this.firstYearSalary = firstYearSalary;
this.secondYearSalary = secondYearSalary;
this.thirdYearSalary = thirdYearSalary;
}
public void write(DataOutput out) throws IOException {
out.writeLong(firstYearSalary);
out.writeLong(secondYearSalary);
out.writeLong(thirdYearSalary);
}
public void readFields(DataInput in) throws IOException {
this.firstYearSalary = in.readLong();
this.secondYearSalary = in.readLong();
this.thirdYearSalary = in.readLong();
}
}
|
此时,在 Mapper,Reducer 中就可以使用自定义的 StuSalary 类型的。
自定义分区
默认的分区是 HashParatitioner,保证相同的 key 数据进入到同一分区。有时候我们希望一组相同的 key 进入到同一分区,这时候就会用到自定义分区器。主要是实现 Partitioner 接口的 getParatition 方法
1
2
3
4
5
6
7
8
9
10
11
12
13
14
15
| public class CustomPartitioner extends Partitioner<Text, StuSalary> {
@Override
public int getPartition(Text text, StuSalary stusalary, int numPartitions) {
int partition=0;
final String name = text.toString();
if(name.startsWith("zhang")) {
partition=1;
} else if(appkey.startsWith("li")) {
partition=2;
} else {
partition=0;
}
return partition;
}
}
|
如果想使用自定义分区器,需要在 Driver 中设置 job.setPartitionerClass(CustomPartitioner.class);。并且最好保证 reduceTask 数量和自定义分区数保持一致,否则可能出现空文件或者异常报错。这里三个分区,所以设置 job.setNumReduceTasks(3);
自定义排序
上面的都是 value 类型为自定义类型,那么如果 key 也是自定义类型呢?MR 的 shuffle 阶段会按照 key 排序。所以要想使用自定义类型,必须实现对应的排序方法
。需要实现 WritableComparable 的 compareTo 方法。
1
2
3
4
| public int compareTo(StuSalary stu) {
return 0;
|